


Der Fischgrätenzopf
Der Fischgrätenzopf
tutorial samstag.
(English version below)
Im Sommer braucht die Haarpracht etwas Abwechslung, daher zeigen wir euch heute den Fischgrätenzopf. Wunderschön und super einfach.
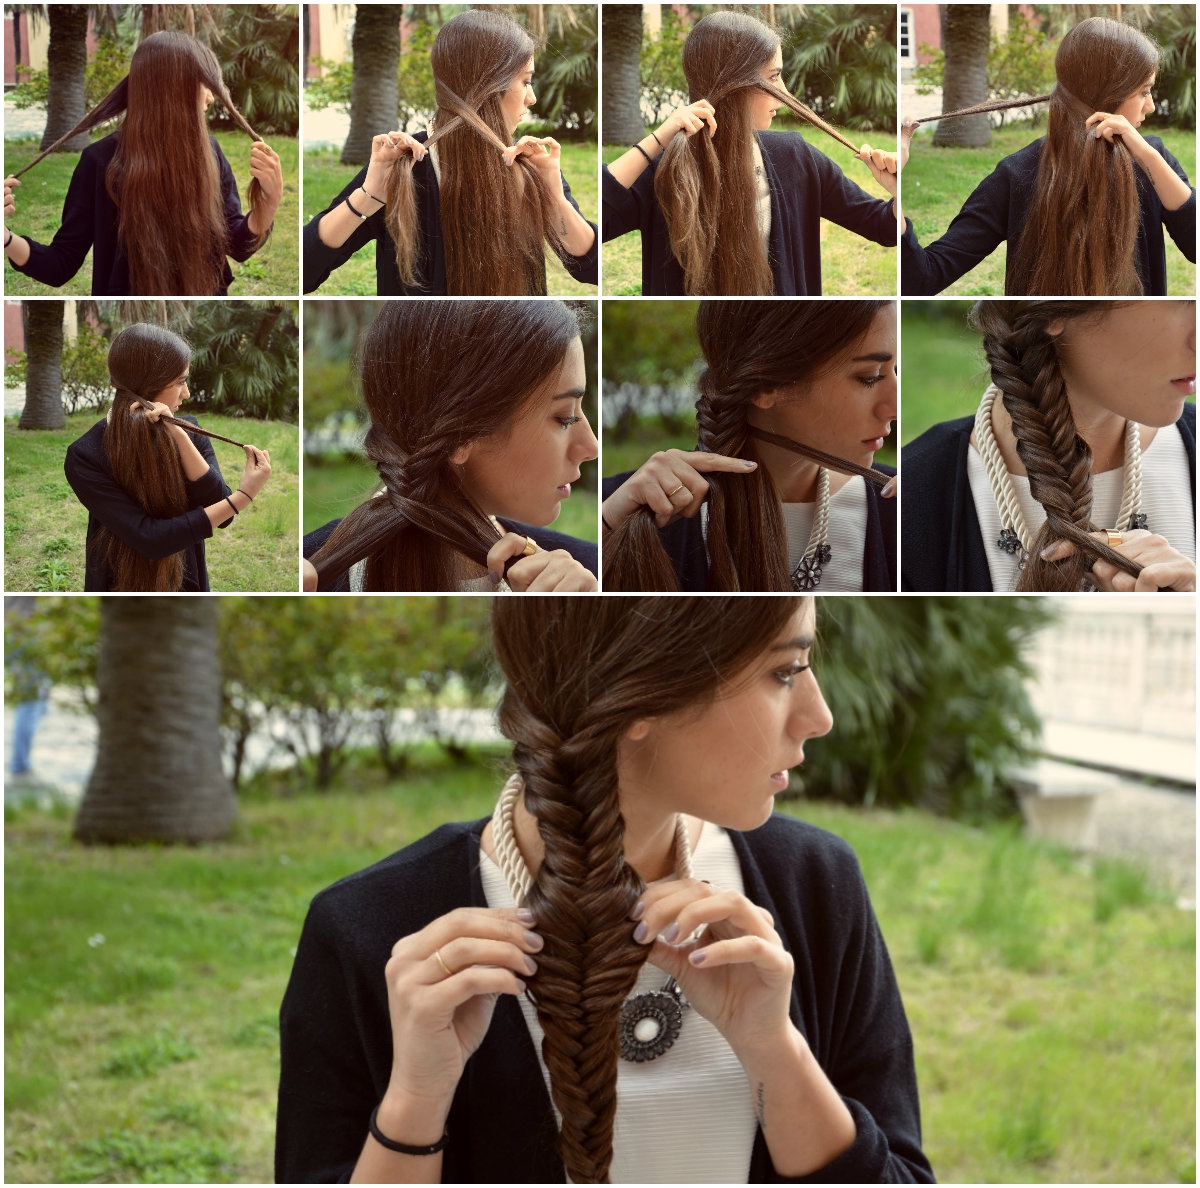
1. Haare durchkämmen und links und rechts je eine gleichgroße Strähne abtrennen.
2. Die zwei Strähnen überkreutzen. Wenn die linke Strähne oben ist, dann von der rechten Außenseite des Haupthaars eine dünne Strähne abtrennen und nach links führen auf die andere Strähne.
3. Nun von der linken Seite eine kleine Strähne nehmen und auf die rechte Seite bringen, sodass man immer nur mit zwei Strähnen arbeitet.
4. Diesen Vorgang solange wiederholen bis ihr das gesamte Haupthaar eingefangen habt. Jetzt solltet ihr zwei gleich dicke Strähnen haben und die Fischgrätenstrucktur langsam erkennen.
5. Mit den zwei Strähnen flechtet ihr wie gewohnt weiter. Teile von der Außenseite der einen Hauptsträhne eine dünne Haarsträhne ab und führe diese zur Innenseite der anderen Strähne. Je schmaler die abgeteilten Strähnen sind, desto filigraner wird der Zopf – desto länger dauert aber auch das Flechten. Achte immer darauf, den Zopf stramm zu halten bis der Zopf zu ende geflochten ist.
Wer seinen Zopf etwas messier und wilder mag, der kann zum Schluss an den einzelnen Strähnen zupfen und den strammen Zopf etwas lockern.
Viel Spaß beim Ausprobieren.
xxx,
the ladies.
During the summer months it’s too hot to keep the hair down. So today we’re going to show you one of many ways to do your hair. The fishtail braid, beautiful and very easy!
1. Comb your hair and separate two equal strands from both the farther most left side and farther most right side of your hair.
2. Cross both strands. If the left strand is above the right one, you continue by taking a thin strand from the right side of the main hair and bring it over to the left side on top of the other strands.
3. Now take a small strand from the left side and bring it over to the right. Remember! You only work with two strands.
4. Repeat this process until you’ve captured the entire main hair and are left with two equally thick strands. Can you make out the fishtail structure already?
5. Now continue the process with the two strands. Take a thin strand from the farther most part of the one strand and bring it to the opposite side, and so on.
6. The narrower the divided strands are, the more filigree is the braid – but it also takes longer to finish. Make sure to keep the braid tight until you’re finished.
7. If you like the braid to be somewhat messier and wilder, you can pluck the end of the individual strands and loosen the braid .


1 Comment